To add XP install images to WDS, or modified Vista/7 images is a multi-step process:
- First, you need an fresh install of Windows, any version, with all Windows updates and patches installed. I hope you all know how to do this.
- Next, you install any applications you want to have pre-installed on the system (e.g. Adobe Reader, Flash, etc.)
- Now it’s time for SYSPREP. You cannot capture an image unless it has been prepared with Sysprep! (I hope you are familiar with Sysprep too.)
- FixIDE for XP (optional, but recommended)
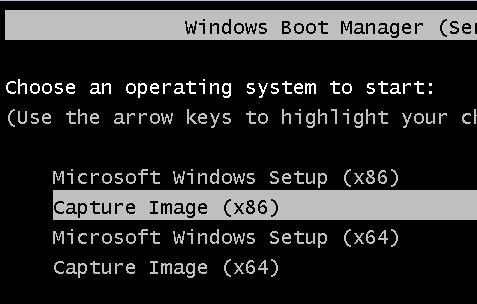
- Next you’ll need to “capture” the image by booting to WDS and selecting the Capture Image option for your platform (x86 or x64).
- Once the image is “captured” and named, it will appear as an install option when you boot to WDS > Microsoft Windows Setup (x86 / x64)
- Now you can install this captured image on any PC, a fully updated / fully loaded version of Windows (XP-7) with all your preferred apps pre-installed, in mere minutes!
Install Windows, update, configure:
- Use standard methods for Windows XP, or try out your new WDS installation method for Windows Vista/7 by booting to WDS > Microsoft Windows Setup (x86 / x64)
- You will create a temporary user account of course to do your thing.
- In Vista/7, I recommend calling the user “TEMP” and it may remain after all is said and done, but it can be deleted at a later stage.
- In Windows XP, you will NOT be prompted to create a new user after deployment during the OOBE, so name it something generic but usable, such as “User”
- If using VirtualBox to perform your installs, it is ok to install the Guest Additions; you can remove them prior to running Sysprep.
- Install all Windows updates
- For Windows XP, you may want to use a product key to activate Windows temporarily so you can install updates, go ahead and use any key you have laying around. That product key will be erased when Sysprep works it’s magic in the next step.
- Install the apps you’ll want to be pre-installed on every PC now, e.g. Adobe Reader, Flash, etc.
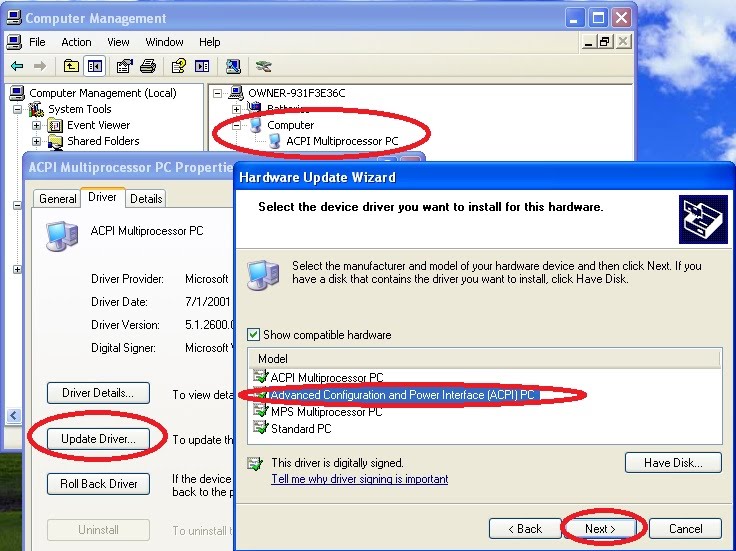
- NOTE: I recommend to initially install Windows on a MULTI-PROCESSOR system, so the Multiprocessor HAL will be installed.
- Then AFTER deploying your image, you can change your Computer driver in Device Manager from ACPI Multiprocessor PC to Advanced Configuration and Power Interface (ACPI) PC. This way you can restore the created image to ANY hardware with the proper HAL installed.
- You will create a temporary user account of course to do your thing.
Sysprep:
The Sysprep.inf file allows for some unattended/automated answer responses to ease the burden of Windows setup / OOBE. Also for Windows XP it is very useful for adding drivers to be installed automatically during the minimal installation process it will undergo after deploying a customized image.
For Windows XP, you can get Sysprep here. See the sub section on creating a Sysprep.inf file for Windows XP. You can also view or download a copy of my personalized Sysprep.inf (only for XP), which you should rename to remove the .txt extension if you download it to use as a template.
- Extract to C:\Sysprep
- You may also add common drivers to Sysprep so that they are automatically installed where needed during the XP installation process, example Chipset drivers, VGA drivers, NIC drivers, HD Audio drivers, etc. etc.
- That process is outlined in the Add Drivers to XP Images (with Sysprep.inf) section of this guide.
- This process is highly recommended and will save you TONS of time – just think, any driver you add to Sysprep is a driver you’ll never have to manually install again.
For Vista/7, Sysprep is found in \Windows\System32\sysprep and you should leave it there.
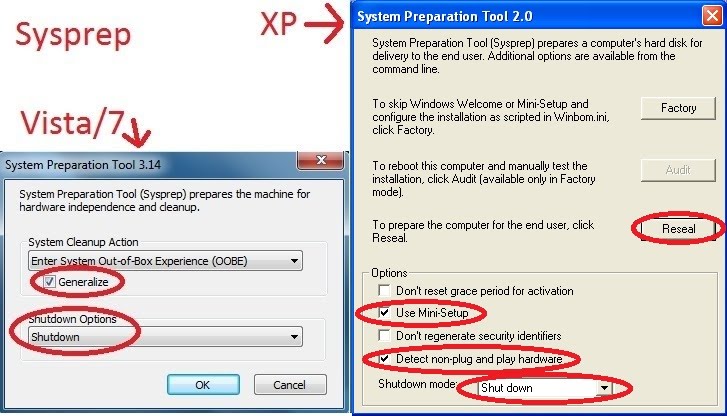
For all OSes, simply run Sysprep.exe from where it lives, and chose your options noting the items below:
- In Vista/7, you will want to check Generalize and chose Shutdown as the mode.
- With XP Pro, you need to check Mini-Setup, otherwise your sysprep.inf file will be ignored!
- In XP when you click Reseal, you will be prompted to regenerate SIDs, and yes you do want to do this, so click the OK button.
Sysprep (with added drivers) can take quite a bit of time to work it’s magic. Normally without drivers it will complete in seconds. When adding drivers to Sysprep, the more you add, the longer it takes – it isn’t uncommon for this to take 20 minutes or more depending on how many drivers you have added.
FixIDE:
- For Windows XP (and possibly Vista) you may run into 0x7b blue screens when deploying the image to a different PC with a different HDD controller. For this reason, then after you have ran Sysprep and shutdown the PC, you will want to slave the HARD DRIVE to another PC, and run our FixIDE utility on it, which will force the standard IDE contoller drivers to be installed.
- FixIDE information and download
Capture the image:
Your very next step is turn on the system, boot to the network, and choose to capture the image.
Note: you cannot skip the Sysprep step, as you WILL get an error when trying to capture the image if it has not been prepared with Sysprep.
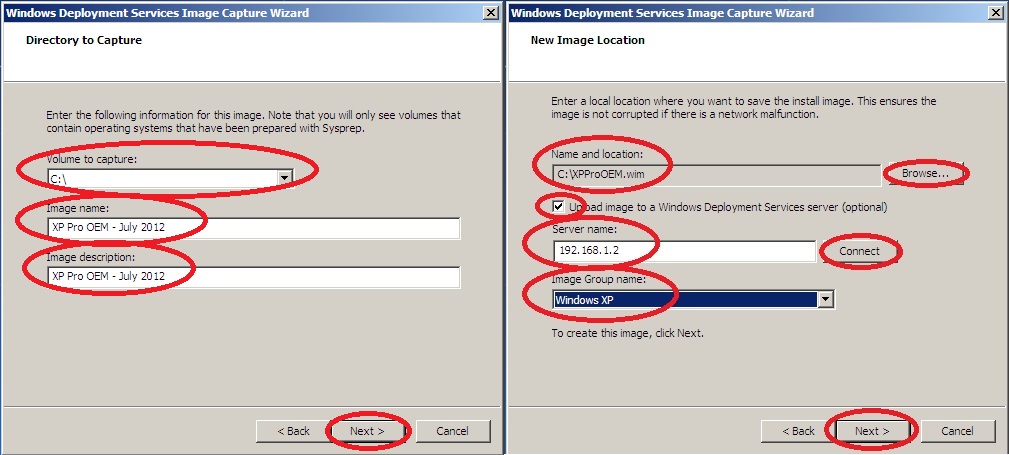
The capture an image wizard will ask you what group to put the image in.
- If doing Vista/7, simply select the existing group that applies.
- If doing Windows XP, you may want to create a new group on the server BEFORE booting to the capture image wizard.
- Back on the server, in the server manager, drill down to Roles > Windows Deployment Services > Servers > [your server name] > Install Images
- Right-click in the empty space in the right pane, and choose Add Image Group.
- Name it as you wish e.g. “Windows XP”
- I like to name my captured image with the month/year, so I know when the last time it was fully updated with Windows updates was at a glance when deploying.
- Also the capture wizard will ask you what to name / where to save the WIM file. This part confused me for a bit, but what you need to do is simply browse and save it to your local C: drive, and name it something descriptive, e.g. “WindowsXPHome.wim” or whatever. The file will be temporarily saved there, but don’t worry, it will not appear in the final image.
When the capture wizard completes, your image should be available for install now by booting to WDS > Microsoft Windows Setup (x86 or x64).
After you deploy one of your fresh images, you may have that TEMP user account still there; it is ok to remove this account now.
Now here comes the work…….
Unfortunately, now you will want to install your Windows Vista/7 images for all editions in both x86 and x64 flavors, perform all Windows updates, install all of your apps, and re-capture the images to WDS! Yes I know, you just did all of that! It can be very time consuming to do this, but once done, you are all set to deploy customized versions of all Windows editions with current updates!
I try to deploy, update, then re-capture all of my images once or twice a year to catch up on all Windows updates since my last capture, and sometimes I make little changes here and there as far as apps I like to have pre-installed. (Honestly I usually only do the most frequently used, e.g. the XP-7 Home and Pro flavors, and tend to get lazy and skip the less frequently used such as Ultimate and Starter editions.) I figure the time/work involved is far worth the effort in the time and work saved when you don’t have to update Windows after install (or don’t have to update it that much…)
Congratulations!
Now you can install a XP-7 fully patched with all your preferred apps in mere minutes!
Imagine, over gigabit LAN you can deploy XP and be at the login screen in less than 5 minutes! Expect a little longer for the increased sizes of Vista/7 and more so if your gigabit is crappy hardware, you have a lot of network traffic, or you are on 100 network 🙁
Network Boot Guide
- Install WDS (Windows Deployment Services)
- Add Vista/7 Images to WDS
- Add Drivers to boot.wim (for Vista/7 Images)
- Add Drivers to XP Images (with Sysprep.inf)
- Add XP or Modified Vista/7 Images to WDS <- You are here!
- Install Syslinux
- Troubleshooting Issues
Back to the main Tech Info page!
Latest News
-
Windows 11 Optimizer v25.12.18.0 v25.12.18.0 Release Notes Additions: Bitlocker (Windows 11 Pro) and Drive...
Read More -
Windows 11 Optimizer v25.12.9.0 v25.12.9.0 Release Notes Fixes: TPM not properly detected on some...
Read More -
Windows 11 Optimizer v25.11.19.0 v25.11.19.0 Release Notes General Additions and Fixes: Added Info drop...
Read More -
Windows 11 Optimizer Release Notes (Week 1) and What Went Wrong in Carey Holzman’s First Live Stream My apologies for the long post, but it’s all directly...
Read More -
Uncle Carey’s Windows 11 Optimizer (Release) Uncle Carey’s Windows 11 Optimizer was conceived by Carey Holzman and developed by...
Read More -
Spring Sale: 70% OFF d7x 1yr & CryptoPrevent Bulk 70% OFF d7x Annual (1st Year Only) or 1 Year...
Read More -
CryptoPrevent v23.5.5.0 just released! v23.5.3.0 Fixed an issue sending email with Office 365 SMTP...
Read More -
d7x v23.1.12 Release Notes Resolved an issue where DataGrab would backup everything except your...
Read More -
d7x v22.8.10 Release Notes Resolved an issue with the “Reset Networking” and “Repair Winsock”...
Read More -
d7x v22.8.9 Release Notes Resolved an issue with the “Set Time Zone” feature on...
Read More


